Due to the fresh ingredients, all orders except Sourdough Starter must either be picked up or delivered within the Tampa Area Metro, or with 1 day shipping! Dismiss
Congratulations on your purchase of a “Loaf in a Jar!” If you’re here, you’re in for a treat. Quite literally. Sourdough has an ancient history, and is probably one of the most beneficial things you can eat. As someone who has always been carb conscious, I can tell you it has become a staple in my diet, and has such a low glycemic impact, it is not worth mentioning. (But I probably will anyway) For now, let focus on getting you started on making your fist loaf, and what you can expect.
Starting with Your Starter...
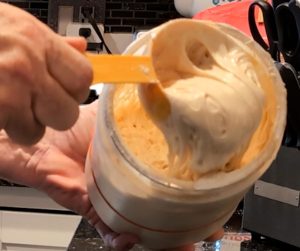
Weather, age, water, temperature, all these things and more can effect how your bread turns out, but by far, STARTER is the most important factor in making your dough rise, and baking a successful boule (French for round bread loaf). The beauty is, we’ve taken all the guess work out of it, since you purchased one of starter mixes. Each jar is good for 1 loaf of bread, either small or large loaf, all you need to do is add flour. You can use any flour you like, but we recommend one that is not enriched or bleached.
Starting with our mature, well fed, and bubbly starter will make the rest of the process so much easier, just follow below!
Artesian Sourdough,
Step-by-Step
For this Recipe, you'll Need:
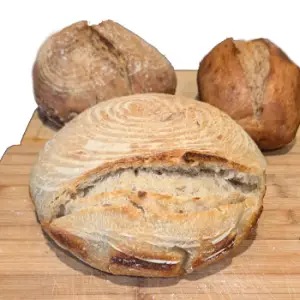
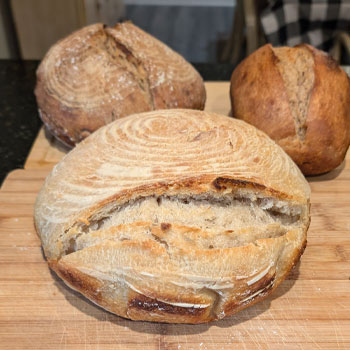
Typical White Sourdough Boule, with a nice "ear"
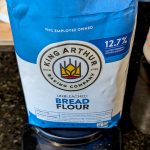
500g. Unbleached, un-enriched, white all purpose or bread flour (900 for Lg. boule)
12g salt (24g for Lg), or about 1 tablespoon
That’s it! 3 ingredients, nothing more.
NEVER use enriched, or bleached flour! These contain manmade chemicals and proteins, preservatives, and other “additives” that many people have grown sensitive to. We like “King Arthur” brand flour.
Using a gram scale ensures repeatable results! This link on Amazon is a nice option with simple features at a good price!
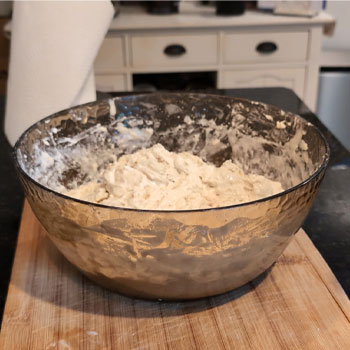
In a mixer, or a large bowl if mixing by hand, add your starter liquid (after shaking well) to your flour, and mix on low for about 2 min, or until a shaggy dough is formed. After sitting covered in a warm area (between 75-83 deg, F.), for 1 hour add the salt, and start a series of 2 “flip and folds”, every 30 min. Simply put, wet your hands, and scoop up the warm dough. Pull it away from the bowl, and fold it in on itself. Then, turn the bowl 1/4 around, and do the same, until all 4 sides have been folded over on itself. (see short video below) When done with the 2 folds, let rest covered for another hour.
Mixing
Cover and put back in it’s warm area for 30 min. Repeat the flip and fold, and then let rest for another 30 min before the 3rd and final flip and fold
(total of 2) Now, let it begin to proof!
A word about Proofing
Proofing is a necessary step, and often the biggest point of failure! This is mostly due to the variables in the process, but none more so than temperature! Starter gets gassy, and releases bubbles in your dough, making it rise. Sometimes a little, sometimes a lot! Maybe even almost double. The ideal temp should be somewhere between 75 and 82 degrees Fahrenheit (28c)
Once you’ve flipped the dough 2 times, usually letting it rest for an hour covered up will cause it to rise, at least a little. Sometimes it will rise quite a bit, and that’s great! Just keep an eye on it, once it gives a little under a gentle touch without being too sticky, it should be ready to shape.
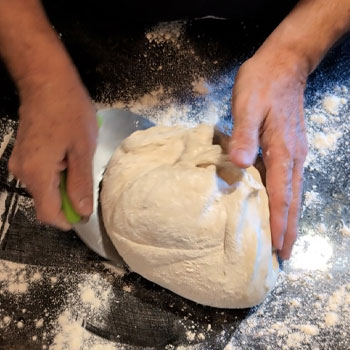
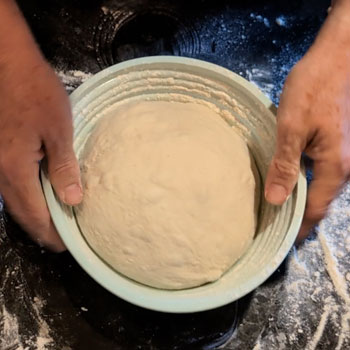
Shaping your Boule
Some find that shaping your bread is not necessary, especially if you’re going for the rustic, artesian round boule. I like to add a bit of shaping, because it seems to help develop the crumb in the final step. Dump your loaf onto a floured surface, and use a bench scraper to start shaping. Be careful not to handle it too hard, you might break those precious air bubbles that have formed inside your boule!
Cover your work area and your hands with a bit of flour, and turn out your dough! Sprinkle a bit of flour on top, and gently stretch it out in a rectangle, then fold it over on itself. This distributes the bubbles a bit ore evenly, and prepares your bread to rest and cold proof. Now roll it gently like a big burrito, and “cup and turn” it on itself for about 15-20 rotations, to shape it into a ball. I like to put loaves in a silicone banneton after shaping, then into the refrigerator overnight.See the video for more info on shaping.
(Video Coming Soon) This process is the last step before you should refrigerate it overnight to develop more complex flavor, and better baking results. If you’re in a hurry, you can skip it and go right into the oven after shaping, but I like to let it “cold proof” for a few hours at least.
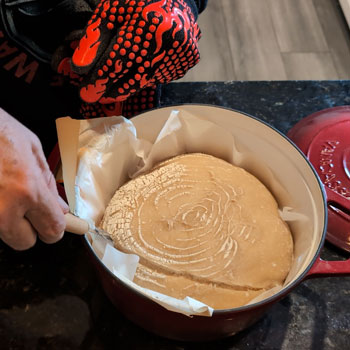
The next day, get an iron skillet, or a Dutch oven, and set your oven for 500 degrees. Let it come to temp, then bring your bread out of the fridge. It helps if it is cold to get it out of the banneton and into the oven. The bake process varies on climate and your oven, but be ready with an internal stick thermometer
Baking and Scoring
The baking of bread is somewhat controversial, because everyone has their own opinion. My suggestion is to take notes, measurements, temps, and keep a log. Once you see how much your loaf can vary based on if you leave it uncovered, use a steamer or Dutch oven, it will amaze you how the results can change!
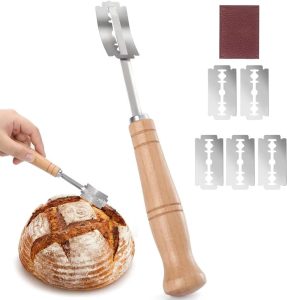
Some people are able to score their bread before they put it in the oven. I’ve not been so lucky, mostly due to humidity and temperature in Florida. The trick I found is to bake it for about 10 min first, then use a razor lame tool to cut a gouge at a half-moon down about 1/2 inch (see photo above). The scoring allows the bread to “break out” and rise about another inch or so, and gives a nice, crispy “ear” (photo right)
Baking Bread
Sourdough bakers have a motto.. “If your starter has doubled, bake bread!” Every time I see my container go to 50%, I get our the scale and flour! I hate to waste discard, so we keep it and dehydrate it, store it in the fridge, or give it away to a friend so they can make a fresh loaf!
After your 10 min “ear” window goes off, set another alarm for 15 min, and baste with butter. Sent another alarm for 10 min, then check the temp. If the temp is over 203F, you’re done! Wrap it in a towel for about an hour before you cut into it. It’s tempting, but it may turn “gummy” if you cut before then.